|
|
Post by foglaursen on Oct 1, 2014 8:40:55 GMT
I get the following mpg: Morris 1800: 11.2 km/l Wolseley 18/85: 12.1 km/l MGB: 11.8 km/l Mostly open roads and motorways, and no steep hills in Denmark. I keep record of the mileage on www.fuelly.comPeter  |
|
|
|
Post by tommydp on Oct 1, 2014 14:49:41 GMT
Thanks for your replies, guys! mpg, l/ 100 kms, km/ l... oh dear:-) To make confusions complete, Norwegians only use litres/ 10 km (Norwegian "mil") for fuel consumption. Glad I found this: www.cleavebooks.co.uk/scol/ccfuel.htmTommy |
|
|
|
Post by tommydp on Oct 10, 2014 20:11:03 GMT
My niece, soon 17, is learning to drive. I've driven a bit with her earlier with our Freelander. Other than that, she's driven new cars like an Audi, a Focus and so on. I was very happy, and rather surprised, when she suggested to take the 1800 for a drive!
Great I thought, I believe trying different cars make you a good driver. Kids today are not familiar with ignition keys and manual handbrakes, let alone the 1800 handbrake! I believe they should.
So, off we went today! She's become a good driver, but we decided it was wise to start on a large, open space to get to know it. The steering, with the large steering wheel and the lack of PAS was the greatest difference obviously. Also, we needed some time to get used to taking off in 1st.
However, after 10 minutes we were ready for the road. It was marvellous, she handled it very well in deed and enjoyed driving it. We actually drove 100 kms, on various roads. We drove both country roads and motorway driving at 90 kmh. According to her it wasn't much different from a modern car on the road. She found it stable, and responsive. However, she found it quite "heavy" city driving and especially parking.
A great day! She's now the 4th generation in the family behind the wheel of the blue 1800. Not many cars live to see that, I guess.
Tommy.
|
|
|
|
Post by Penguin45 on Oct 11, 2014 9:41:03 GMT
Lovely story. Our Alex is learning to drive at the moment. He has been out in the Matiz a few times and is eyeing up the Wolseley. Not yet...  Chris. |
|
|
|
Post by tommydp on Nov 15, 2014 9:58:43 GMT
Yesterday I received the cylinder head, which has been rebuilt by mr Peter Burgess himself. Everything's new and it's ready to run unleaded. It looks excellent, and I just can't wait fitting it. It will have to wait though, a winter project as the blue one will be laid up anyway (no winter tyres for it...) The reason for fitting it is the block was totally rebuilt as you may remember, however I never had the head rebuilt. The block is off a Princess, that's why it has the smaller inlet valve head, with single valve spring as well as single timing chain. So now it will be more typical mk 2, as the rebuilt head is a mk 2 12 H 2709 head, with the larger inlet valves. As mentioned in another thread, I've had some issues with the ignition advancing too much compared to the static timing, even though the distributor is overhauled by distributordoctor. I can only imagine this is down to wear on the camshaft, where it meshes with the distributor drive gear. I have noticeable more slack here than on the other 1800, and other drive gears have not improved it. While the engine has been running well, I will also try to improve this by fitting another cam when I'm into the engine again. I replace the cam through the inner wing, so engine does not have to come out. Luckily, I have a mk 2 camshaft which looks excellent. I reallly had forgotten about it. I got it off ebay as an MGB cam, but only now I discovered it is the mk2 1800 cam! Talking of luck! It has the correct part number stamped on it. So everything is now ready, I have nos timing chain, tensioner, cam and crank sprocket wheels. I've also got new tappets and pushrods, also supplied by Burgess. All I need is a Payen head gasket set.. It's going to be an interesting project! 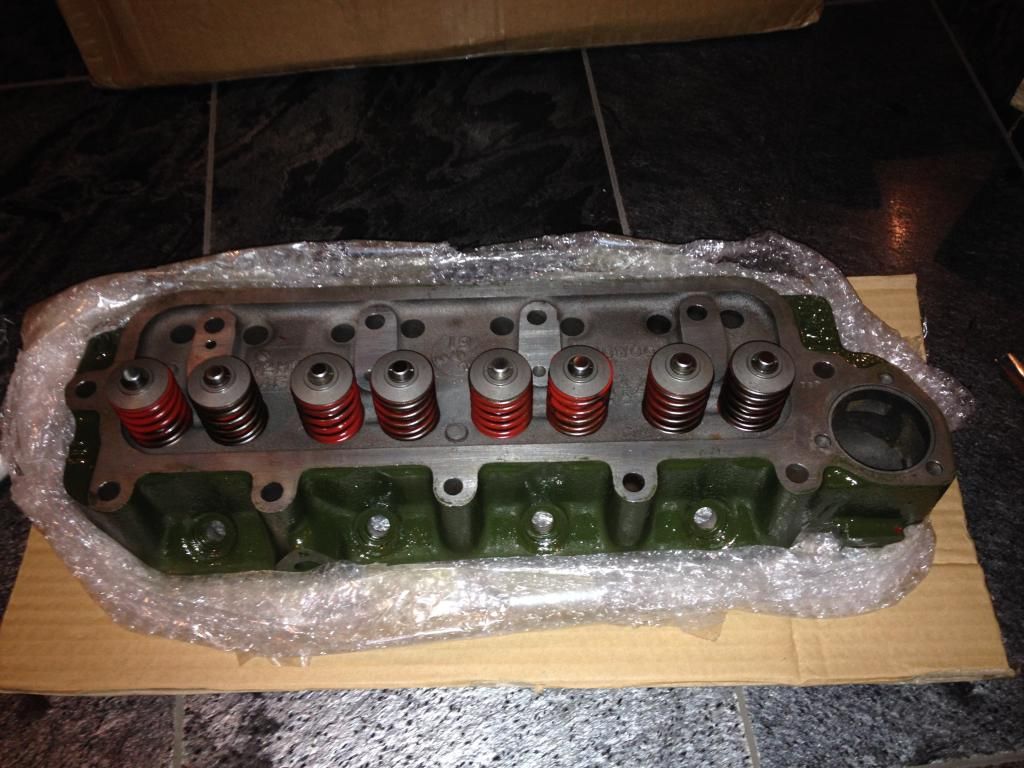 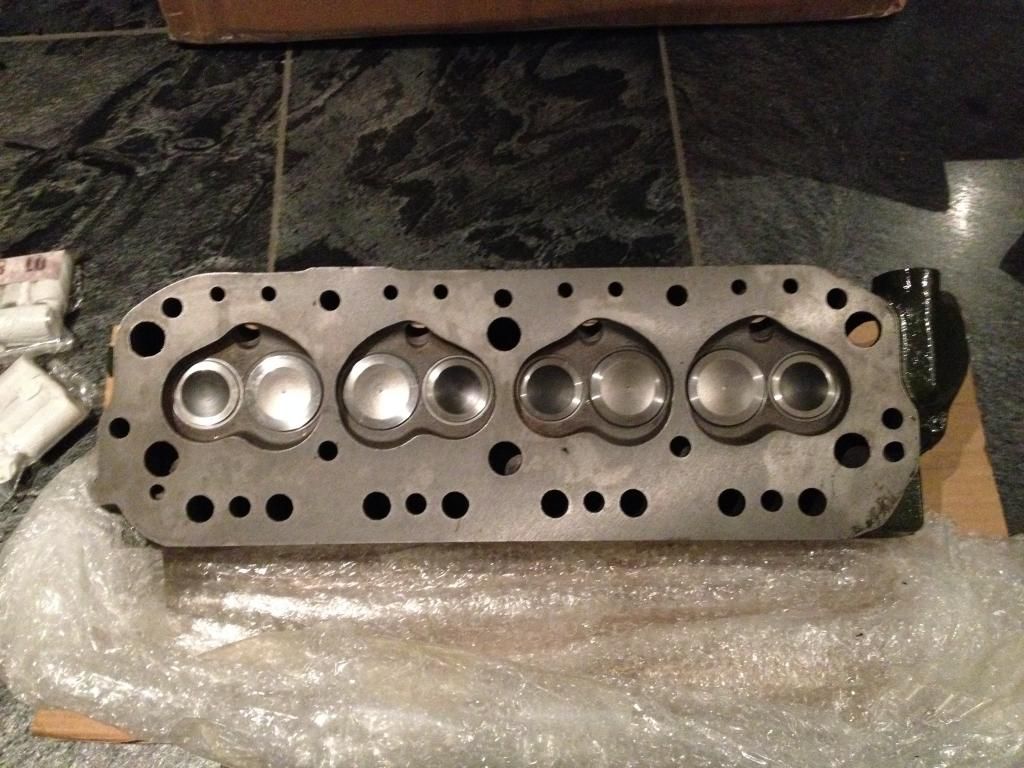 Tommy |
|
|
|
Post by Penguin45 on Nov 15, 2014 10:15:48 GMT
A thing of great beauty, Tommy. I would be unable to resist getting the spanners out and getting stuck in. Change the cam in the car? You haven't got a hole in the inner wing have you? Very bad............  Chris. |
|
|
|
Post by tommydp on Nov 15, 2014 11:32:03 GMT
I'm very eager to start, Chris! It will have to wait for a while though..
No problem pulling the cam out of the 1800. It's just a matter of removing the radiator, saw off one end of the appropriate fin of the inner wing grille and bend this fin away. Be aware though, the cam cannot be removed from mk 1 and early mk2 engines, as the oil pump has to come out first.
Tommy
|
|
|
|
Post by dave1800 on Nov 15, 2014 12:48:01 GMT
Hi Tommy Does the Princess block have the "scallops" cut out for the larger inlet valve clearance? I know you can fit a Mk1 head to a Mk11 block but not the other way round without modification for that reason. Looks as though you will be busy over the winter! regards David The reason for fitting it is the block was totally rebuilt as you may remember, however I never had the head rebuilt. The block is off a Princess, that's why it has the smaller inlet valve head, with single valve spring as well as single timing chain. So now it will be more typical mk 2, as the rebuilt head is a mk 2 12 H 2709 head, with the larger inlet valves. Tommy |
|
|
|
Post by tommydp on Nov 15, 2014 13:44:59 GMT
It does have cut outs. I will measure accurately, comparing with a mk 2 block to be sure they are wide enough. No idea what to do if they're not.
I've had a mk 2 head fitted to this block earlier, withouht any obvious issues. I suppose one would notice if the cut outs were not giving the valves enough room?
Tommy
|
|
|
|
Post by tommydp on Nov 15, 2014 20:14:12 GMT
Had a look at a mk 2 block now, and of course the cut outs are for the exhaust valves. I'll measure and compare it to the Princess block to be sure. I', pretty sure the Princess block has the cut outs too. Some words from the expert: www.mg-cars.org.uk/peterburgess/exhaustcutouts.htmlOther than that, I don't think there are any differences. The coolant drillings are a bit different when it comes to size, but I don't think it matters. And of course i need to fit an inline oil feed rocker shaft assembly. Any experience on fitting a mk 2 head to a Princess block is welcome! Surely I can't be the first one to try this. As mentioned, I've had it done before without any obvious issues, but I want to be 100 % sure in order not to ruin the Burgess head! Tommy. |
|
|
|
Post by dave1800 on Nov 16, 2014 1:34:11 GMT
I had wrongly understood that the cut outs were for the larger inlet valves but as you point out they are for the exhaust valves. I should have known this! I would think that if the Princess has the cut outs that it should be OK. The Burgess link you posted show the dimensions and suggests using a not too rough file if you need to modify. You could use the method he suggests for marking out the scallops to ensure you have clearance. Ie lower the head in place without a gasket, not tightened down.
Slacken off all the tappet adjustments fully. There is no need to put inlet valve pushrods in place. Adjust the exhaust valve clearances to 15/1000" PLUS 80/1000 and turn the engine by hand until the exhaust valve is in the fully open position. You may wish to put some modelling clay or similar in the scallop to record the valve movement. Check to ensure the valve does not touch the block. You may wish to compare the other MK11 head you have used on a Princess block with the Burgess head. Repeat above but progresively close the tappet gap until the valve just touches the block and this will give you an idea of how much tolerance you have. You could ask Peter Burgess, I would think someone has already used a Princess block in a MGB somewhere. Regards David [quote author=" tommydp" source="/post/7496/thread " timestamp="1416059099"]It does have cut outs. I will measure accurately, comparing with a mk 2 block to be sure they are wide enough. No idea what to do if they're not. I've had a mk 2 head fitted to this block earlier, withouht any obvious issues. I suppose one would notice if the cut outs were not giving the valves enough room? Tommy[/quote] |
|
|
|
Post by tommydp on Apr 1, 2015 10:22:55 GMT
Hi all! A quick update from Norway! The blue one has just been taken out. It passed its "MOT" the other week without problems. It had slight play in one lower ball joint, so will have a look at that. I got away with a warning:-) I have installed the Burgess rebuilt cylinder head over the winter. I put in a cam in vgc (confirmed by my uncle) at the same time. Also, nos genuine timing wheels and chain were installed. Correctly, I hope. Also, confirmed by my uncle. There are also new followers, pushrods and rocker assembly installed. I paid more attention to the crank washers this time, putting a straight steel ruler across the wheels, measuring the gap and so on. It seems to work very well, and the valves are far more quiet. It pulls well in deed. I'm running electronic ignition at the moment. Cheap off ebay. No issues however. I've taken the rebuilt distributor out, as I suspect it's not alright. More on that later. It was put to the test on Saturday. We went to the mountains, 300 kms there and back. And we're talking hills here. It cruised along happily and climbed the hills very easily. The reason we took the 1800 was we suddenly realised we had no ski rack for the Countryman or Rover... So, just happiness here:-) More to come! Regards, Tommy   |
|
|
|
Post by dave1800 on Apr 1, 2015 13:34:22 GMT
That's great news Tommy and good to hear the car is running well. Did you take any photos of fitting the camshaft and the timing chain? It would be interesting to know the issue with the rebuilt distributor. Was it also an issue with the new camshaft and less slack in the drive gear or didn't you try it? You can quite easily determine the maximum advance by turning the shaft to the stops and if it advances too fast that seems to point to the springs, strange as it's been rebuilt by an expert. Did you contact him?
Regards
David
|
|
|
|
Post by tommydp on Apr 2, 2015 6:13:20 GMT
Hi Dave! Just the one photo of the timing wheels, unfortuntely. I double checked by finding the exact tdc with a piston stop and degree wheel, and the marks lined up perfectly, both for cylinder one and four firing. Used a steel ruler across the centre of the cam and crank and the marks were perfectly in line. Using all new, genuine wheels and chain, the assembly had no slack. I hope it stays this way. I believe the worn teeth caused the slack earlier and as mentioned I haven't been accurate enough with the crank washers earlier. As you can see, I remove the cam with the engine in car. No problem at all, just a matter of removing the distributor drive gear and petrol pump pushrod, and obviously the cam followers. I assembled it all with engine assembly lube. Red, sticky stuff, and didn't start it until I had oil pressure. I believe it has all bedded in nicely. I've retorqued the head several times, and checked /adjusted the valves. The Payen gasket seems to make re torque unnecessary though. A quality gasket. It's more quiet now, but still some tappet noise from one valve. All fine I guess. Of course I'm very scared to ruin this head in some way, so I'll keep an eye on the valve lash, pinking etc. I adjust by the rule of nine. I still notice the clearances on some valves are quite different at tdc firing compared to the point when they are adjusted by the rule of nine. The clearance on cylinder three inlet, for example has a lot more clearance than 0.015 when at tdc, while ohers are a bit tight. Most of them are more or less 0.015. The cam was virtually as new though, and I stick to adjust by the rule of nine as "the book says". It has 180 compression spot on, on all cylinders, vacuum at idle is a steady needle at 20, the timing marks are rock solid and stable at around 11 degrees btdc at idle. It has normal temperature and does not pink. It runs very well, sounds sweet and healthy and is very responsive. About time I quit being concerned, perhaps:-) Now, for the rebuilt distributor... The symptoms, both before and after the head/ cam change, which I believe boils it down to the distributor itself: Jumping timing marks, setting the static timing at 9 degrees btdc gives more than 15 degrees at idle, correct points gap gives to little dwell. To set the dwell correct I can't get a 0.014 feeler gauge in, so points gap to small. I tried different points, all quality items. The four point gaps are different, and the point gap changes between vacuum applied and not (checked by turning the points plate. Seems to me he cam lobe has not been changed. I've tried another distributor with points and it doesn't behave like this, also the timing marks are steady and the dwell is correct. I think I'll contact distributordoctor and let him have a look at it, as I now run another distributor with the electronic setup. It's been totally reliable, but I always carry points and condenser in the boot.. Tommy 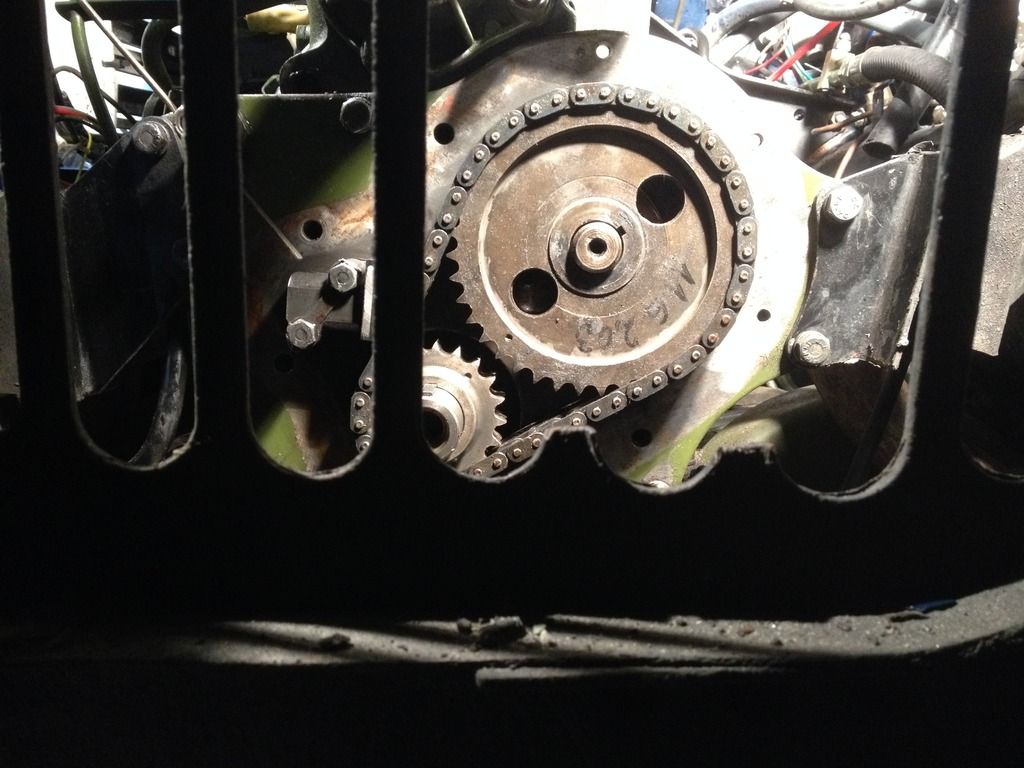 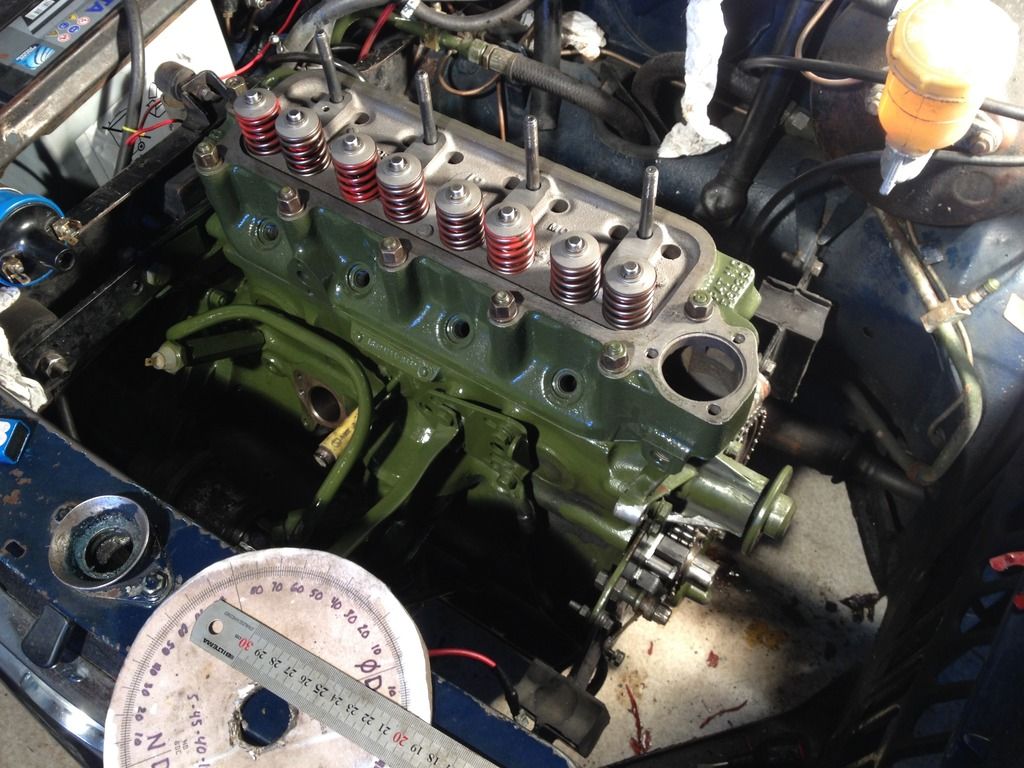 |
|
|
|
Post by foglaursen on Apr 2, 2015 11:00:41 GMT
"As you can see, I remove the cam with the engine in car. No problem at all, just a matter of removing the distributor drive gear and petrol pump pushrod, and obviously the cam followers." I would think, that apart from the distributor drive gear, it would be necessary to remove the oil pump. Am I wrong? Peter |
|


